How to setup DNS cluster on CWP 1 – Install DNS Manager
If you are hosting company and you need to have multiple DNS servers serving multiple requests, the you will need a DNS cluster such as ns1,ns2,ns3 etc.
In CWP, there are two options available
1. Subscribing to slave DNS on CWP hosted servers at a fee
2. manually configure master and slave DNS on your own servers
In this tutorial, i will be looking at how to install and setup master and slave DNS in CWP.The setup works in a very simple way.
You will have your CWPpro webservers, where domains will be hosted and a slave DNS Manager where zone files will be synced to and other nameservers will be connected it.
Lets first start with the configuration of the slave manager.Please note slave manager must be installed on a clean server with only CWP installed.
step 1: create an account on server which will be your slave manager.
CWP.Admin –> User accounts –> New Account –> Here enter the Domain name, Username, Password, Package, Reseller, Inodes limit etc.
In this tutorial, am using the username slave, but you can use any username of your choice
step 2 : Log in slave manager via ssh and Download the slave manager packages
cd /home/slave/public_html
wget http://dl1.centos-webpanel.com/files/cwp/addons/cwp-slave_dns.zip
unzip cwp-slave_dns.zip
mv slave_dns/* .
rm -f index.html cwp-slave_dns.zip
step 3: Fix file permission for the slave user
CWP.Admin –> User accounts –> Fix Permission, Here you can select the user account to fix permission and then click on “Fix Account Permission”
step 4: Create database and User for slave manager
CWP.Admin –> SQL services –> MySQL Manager –> Create database and user
step 5: Rename sample file to get DB connection into production and update with database, user and password create above
cd /home/slave/public_html
mv inc/db_conn.php.sample inc/db_conn.php
nano inc/db_conn.php
step 6: import Database
cd /home/slave/public_html
mysql DATABASENAME < sql/slave_dns.sql
step 7: Create permissions for the user to be able to control the bind DNS.
nano /etc/sudoers.d/slave
Now, add the following to the file above
%slave ALL= NOPASSWD: /bin/systemctl start named
%slave ALL= NOPASSWD: /bin/systemctl stop named
%slave ALL= NOPASSWD: /bin/systemctl restart named
%slave ALL= NOPASSWD: /bin/systemctl reload named
%slave ALL= NOPASSWD: /bin/systemctl status named
%slave ALL= NOPASSWD: /bin/systemctl is-active named
Note: the slave i have used is the username i have used from beginning
step 8: Configure other slave options
touch /etc/named/slave.conf
chmod 771 /etc/named
usermod -a -G named slave
chown slave.named /etc/named/slave.conf
mkdir /var/named/slave
chown named.named /var/named/slave
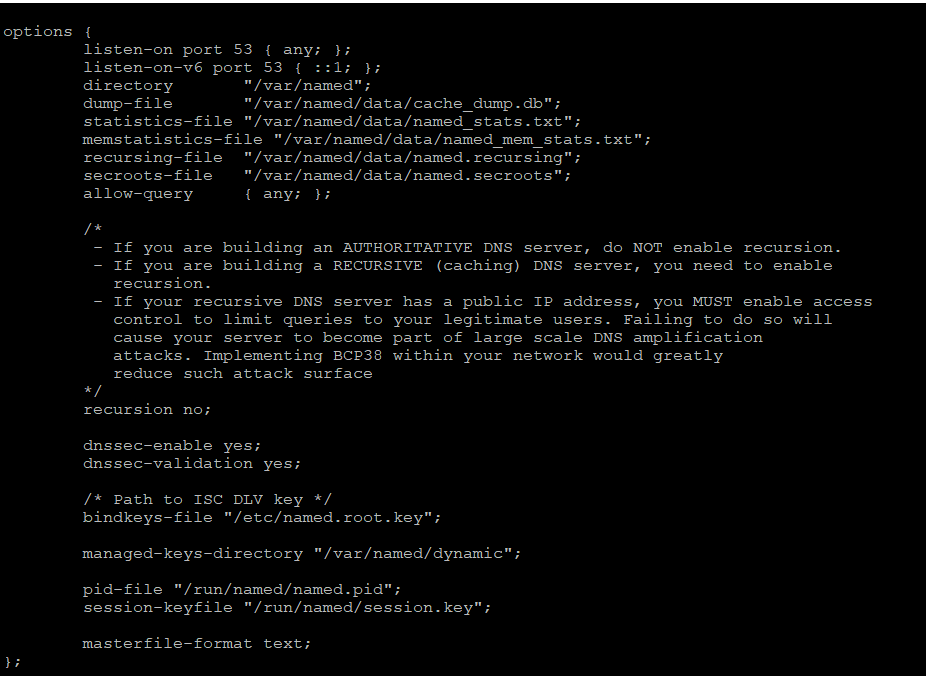
step 9: Edit /etc/named.conf and add this in options{} section before closing bracket }
masterfile-format text;
This is show below:

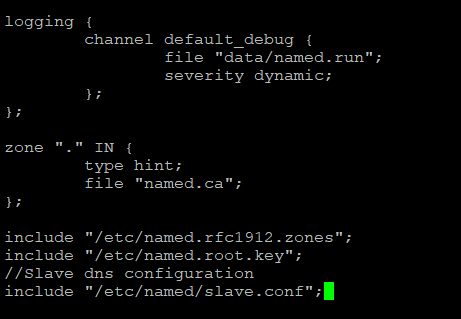
Add the follwing also in /etc/named.conf file after options{} where other include lines are specifed
//Slave dns configuration
include “/etc/named/slave.conf”;

step 10: Log into DNS manager admin portal
Now you can login to DNS Manager GUI by using a domain link of the account you have created
for example, in my lab, access is http://192.168.78.129/~slave
If you have a public domain created during the user account creation, then you can access the domain
Default login for DNS Manager GUI admin
Username: root
Password: FX8QKxvQ
You can change the default password after the first login.
In the next article we will setup CWPpro webserver to connect to the slave manager created above
References:
CWP Wiki